Introduction 📖
In our journey of building a state-of-art application named QIMAone, NgRx forms one of the fundamental blocks to deliver a seamless and rich User experience.
What is NgRx? 🤔
NgRx is a reactive library for Angular that is composed of several modules for managing application state. The inspiration comes from the Redux library, which is a popular library for managing state in a React application.
Why NgRx? 🤔
When it is about developing an application, state are everywhere. This is where NgRx comes to the rescue by providing easy avenues for single point of state management. With NgRx, we don't need a service for each state.
When to Use NgRx? 👍
State Management
When there are multiple services in our application for state management, the store provides a place for UI state to retain it between router views.
Repeated Data Fetch
The NgRx store provides a client-side cache which helps you in reducing the network I/O.
Notify Everyone
When the state is accessed by many components and services across the application, the store notifies all the subscribers.
When Not to Use NgRx? 🙅🏻♂️
- Simple applications
- Little or No component intercommunication
- Synchronizing state → No need to change if you already have a good state management pattern in place.
Architecture of NgRx 🏗


How to Use NgRx 🤨
While getting start with NgRx the key concepts in picture are Store, Actions, Reducers, Selectors, and Effects.
1. Store
NgRx Store is mainly for managing global state across the application. It is a controlled state container designed to help write performant, consistent applications on top of Angular.
Generally, Store is initialized in the root module of the application
e.g.
StoreModule.forRoot({inspectionStore: ispInspectionIdReducer})The StoreModule.forRoot() method registers in the app.module.ts needed to access the Store throughout your application.
What Should Not Go Into Store
- Unshared state
- Form state
- Non-serializable state
2. Actions
Actions are event that has a property describing the action and with optional data associated to them. The value is used to provide context and tell from where the action was dispatched.
2.1 How to Create Action
An Action is made up of a simple interface. The interface has a single property, the type represented as a string. The props method is used to define any additional metadata needed for the handling of action.
e.g.
export const UPDATE_AQL_DEFECTS = '[Aql] Update Aql Defects';

export const updateAqlDefects = createAction(UPDATE_AQL_DEFECTS, props<{ inspectionId: number; aqlDefects: IAqlDefects }>());
This action describes an event triggered by a user to update the AQL Defects. The inspectionId and aqlDefects are defined as additional metadata provided when we dispatch an action.
2.2 How to Dispatch an Action
Use the action creator to dispatch an action
e.g.
this._store.dispatch(updateAqlDefects({ inspectionId: this._inspectionId, aqlDefects }));The above example is how to dispatch an updateAqlDefects action with inspectionId and aqlDefects.
3. Reducer
Reducers are responsible for handling transitions from one state to the another. Reducer functions handle these transitions by determining which actions to handle based on its type. Reducers are pure functions where we can default the current state to an initial state.
3.1 Defining the State
Each reducer function is a listener to one or multiple actions. These actions describe the possible transitions handled by the reducer.
export interface IInspectionState {
  isLoading: boolean;
  inspection: IInspectionConsultation;
  status: InspectionStatus;
  workflow: IWorkflow;
}
Define the shape of the state according to what you are capturing, whether it be a single type such as a number, or a more complex object with multiple properties. For example, inspection, status, and workflow.
3.2 Setting the initial state
The initial state gives the state an initial value, or provides a value if the current state is undefined. You set the initial state with defaults for your required state properties.
Create and export a variable to capture the initial state with one or more default values.
const INSPECTION_INITIAL_STATE: IInspectionState = {
  isLoading: false,
  inspection: null,
  status: null,
  workflow: null,
};
The initial values for isLoading is false and for inspection, status, and workflow are null.
3.3 Creating the reducer function
The reducer function's responsibility is to handle the state transitions in an immutable way. Create a reducer function that handles the actions for managing the state of the
update AQL defects using the createReducer function.
createReducer<IInspectionState>(
	INSPECTION_INITIAL_STATE,
	on(updateAqlDefectsSuccess, (state, { aqlDefects }) => {
		return {
			...state,
			isLoading: false,
			inspection: {
			  ...state.inspection,
			  aqlDefects,
			},
		};
    })
);
In the example above, the reducer is handling an update AQL defects action. Action handles the state transition immutably.
This means that the state transitions are not modifying the original state, but are returning a new state object using the spread operator. The spread syntax copies the properties
from the current state into the object, creating a new reference. This ensures that a new state is produced with each change, preserving the purity of the change.
4. Effects
Manages side effects to keep component pure. Effects take an action, do some work and dispatch a new action.
In an Angular application, components are responsible for interacting with external resources directly through services.
Instead, effects provide a way to interact with those services and isolate them from the components. Effects are where you handle tasks such as fetching data,
long-running tasks that produce multiple events, and other external interactions where your components don't need explicit knowledge of these interactions.
4.1 Registering an Effect
Register an effect in app.module.ts
EffectsModule.forRoot([IspInspectionIdStoreEffects, IspInspectionIdWorkflowStoreEffects]);Inject the store and call the dispatch method
@Effect()
  public updateAqlDefects$ = this._actions$.pipe(
    ofType(updateAqlDefects),
    flatMap(action =>
      this._aqlService.patchAqlByInspectionId(action.inspectionId, action.aqlDefects).pipe(
        map(() => {
          return {
            type: UPDATE_AQL_DEFECTS_SUCCESS,
            aqlDefects: action.aqlDefects,
          };
        })
      )
    )
  );
The updateAqlDefects$ effect is listening for all dispatched actions through the Actions stream, but is only interested in the updateAqlDefects ([Aql] Update AQL Defects)
event using the ofType operator. The stream of actions is then flattened and mapped into a new observable using the flatMap operator. The _aqlService.patchAqlByInspectionId()
method returns an observable that maps the AQL defects to a new action on success. The action is dispatched to the Store where it can be handled by reducers when a
state change is needed.
5. Selectors
Selectors are methods used for obtaining slices of store state. Selectors are a big deal to help get your architecture right. Selectors are pure functions that take slices of state as arguments and return some state data that we can pass to our components.
You may have already seen the store.select method being used to get data from the store by passing it a string value:
this.store.select('inspectionStore');The string represents the name of a slice of state in the store and we can expect this function to return data corresponding to our inspectionStore property. However, store.select can also take a function instead, which takes a slice of state and returns a property from the state
Here is the example using the selectors
export const ISP_INSPECTION_ID_STORE_FEATURE_KEY = 'inspectionStore';

const SELECT_FEATURE: MemoizedSelector<IStoreState, IInspectionState> = createFeatureSelector<IStoreState, IInspectionState>(
  ISP_INSPECTION_ID_STORE_FEATURE_KEY
);

const INSPECTION: MemoizedSelector<IStoreState, IInspectionConsultation> = createSelector(
  SELECT_FEATURE,
  (state: IInspectionState): QpOptionalType<IInspectionConsultation> => state.inspection
);

const AQL_DEFECTS = createSelector(INSPECTION, (inspection): AqlDefectsType => inspection.aqlDefects);

public aqlDefects$: Observable<AqlDefectsType> = this._store.select(AQL_DEFECTS);
6. Notifications of storage data changes 🔔
If you have a specific use case where you don’t want to use selectors instead you can just go the below implementations.
When the actions are dispatched and reducers handled the transition from one state to the next state, it will notify all the subscribers of data change on store so that we can watch on the specific data and filter on not null result and subscribe the data on each change.
e.g.
this._store
  .pipe(
    select('inspectionStore'), // select the store to watch
    select('inspection'), // select the specific data
    filter((val): boolean => null !== val), // filter on not null result
    select('id') // select only the inspection id
  )
  .subscribe((id: number): void => { // subscribe to be notify on each changes
    this._inspectionId = id;
  });
Tooling 🔧
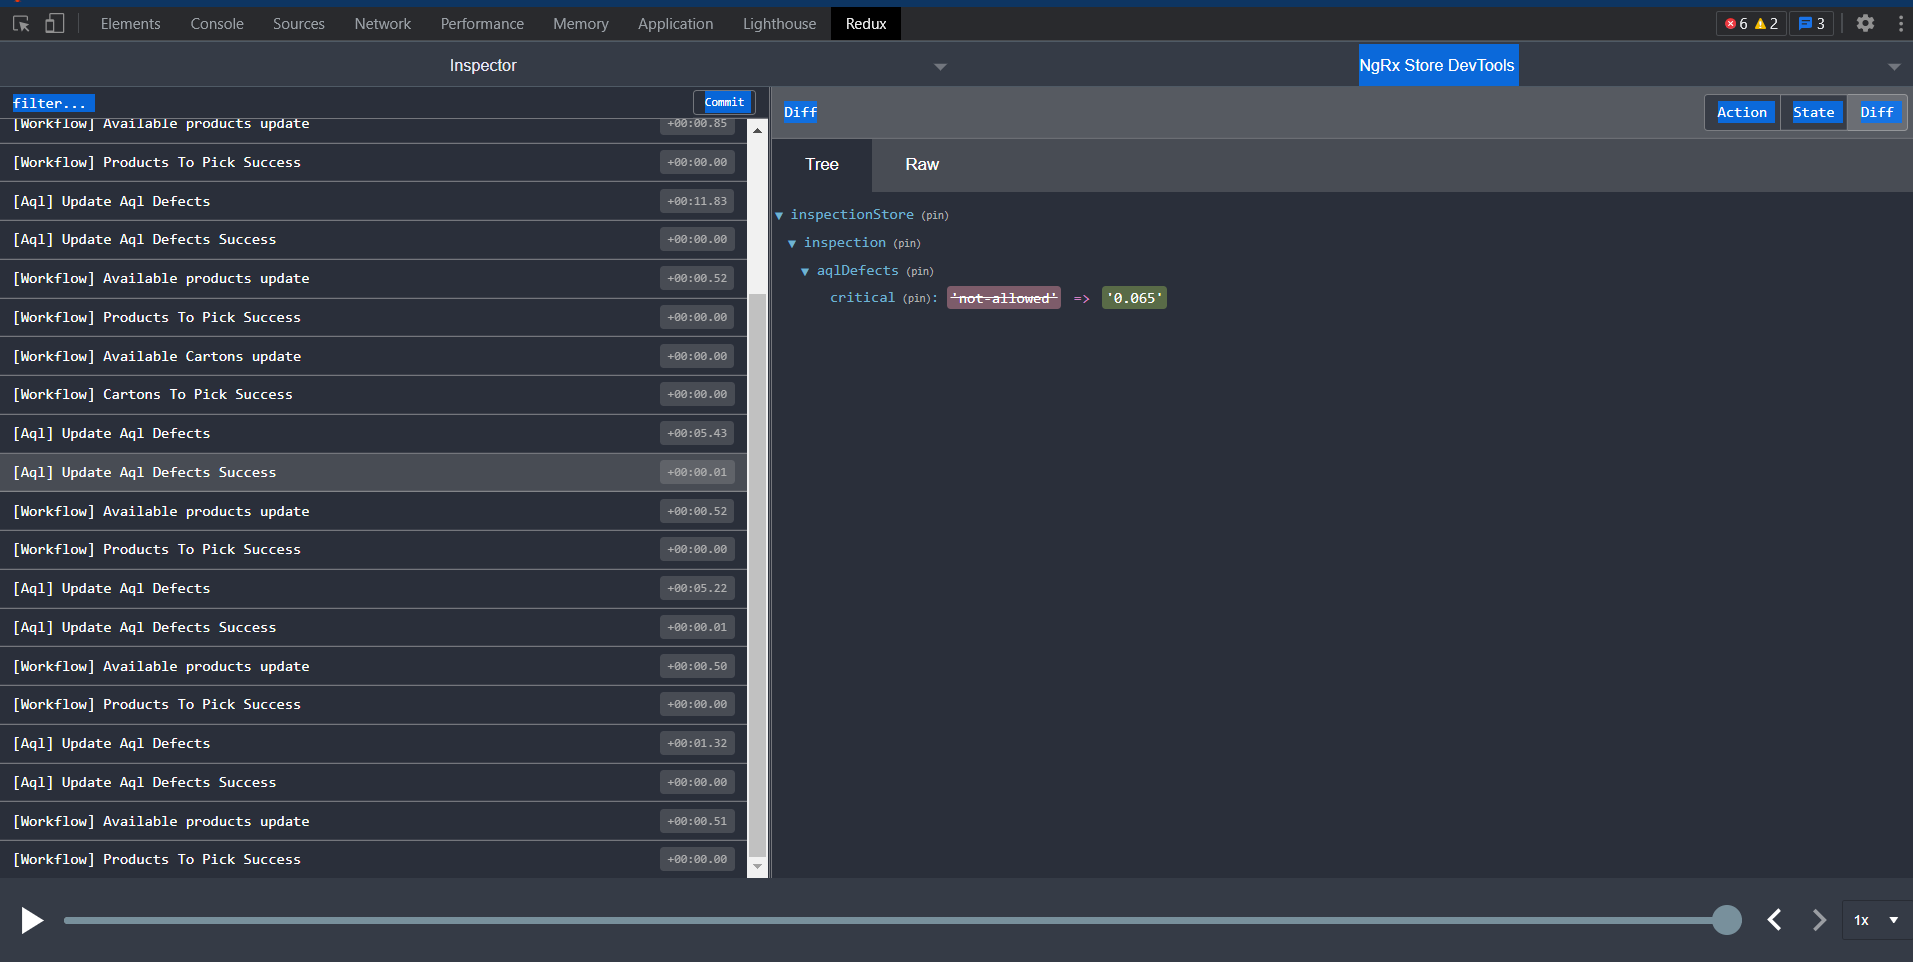
NgRx is a wonderful library, but developing with it can sometimes be hard. It’s complicated to know what's going on behind … but for that, there is a useful browser extension called Redux.
Redux lets developers know what's going on. We got a notification every time an NgRx event appears with the possibility to preview the event’s content 👌. It let you inspect the state of your store at any time.
Conclusion 🎉
In this article, I tried to deliver a clear and clean NgRx introduction by providing you with all you need to know to enter this world.
You can also read the article develop in offline where you can see how we are managing the offline state using NgRx Store.
💟 Thank you!
If you want to be part of this adventure, we are currently hiring more Front-End developers! ✨
At QIMA, we relentlessly help our clients succeed. If you have any suggestion or remark, please share them with us. We are always keen to discuss and learn!
Written by Ahad Ansari, Software Engineer at QIMA. ✍️