In a previous article GitOps powered by Argo projects, we saw how we implemented the GitOps methodology at QIMA to update our various environments using ArgoCD and Argo Workflow. It’s still working well for us but we began to hear more often some same requests coming from the developers: “How can I test my new code?” “Is there a dev environment available to test my new feature?“ “Can you help me to fix my development environment?”
Do these demands sound familiar? That's probably because your fixed number of environment is starting to be a drawback to your technical teams. This was also the case for us. The growth of the teams and the increase of specific cases to be tested amplified this phenomenon to the point of slowing down the teams' productivity.
So, we decided to work on providing on demand environment for technical teams to solve the problem.
In this article, we will present the different steps to successfully provide an on demand environment for a Git pull request. First, how we addressed the prerequisites of an ephemeral environment. Next, the development of new workflows to create and to delete an environment using Argo Workflow. Then, the introduction of Argo Events to react on the Pull requests events and how to smoothly deploy this type of new functionality. Finally, we will overview the challenges ahead.
Autonomous environment prerequisite
Before we can consider an on-demand environment, we need to identify the missing pieces to have a fully independent, autonomous and standardised environment. We choose to pursue our Git repository strategy: one repository to host the application source code and another to host all the configuration and infrastructure code.
Let’s go through some of the topics we analysed and how we resolved the different situations.
Git
We use “one branch per environment” Git branch strategy on our infrastructure repository. So, when updating an environment branch, we merge the changes from the main Git branch, then update the Docker image version files.
- The easiest way to create new ephemeral environment is to continue using this Git branch strategy and thus create a branch per sandbox environment from the main branch.
Kubernetes
We host a SaaS application in Google Kubernetes Engine on Google Cloud Platform. Following our Git repository structure, we host all the Kubernetes descriptors code required for an environment in a single Git repository. You’ll find below, few tips that facilitated our Kubernetes resources management:
- While on GKE, we extended our use of the workload identity feature as much as possible to make it easier to manage the permissions of our Kubernetes service accounts for Google Cloud Platform services.
Use a Templating tool: It helps you avoid code duplication. We prefer Kustomize over Helm because of its ease of use and readability of the descriptors to customise.
For additional information on our Kustomize framework at QIMA, please refer to our last blog article about GitOps at QIMA. We refactored our code to minimise the specifics of an environment. Kustomize vars helped us a lot to do this. At the end, we have only one kustomization.yaml file that is specific to each sandbox environment. It contains some patches and several Kustomize variables. We privileged the vars to the patches because they can be easily updated through a workflow using a SED command or equivalent.
Infrastructure as Code using Terraform
We use Terraform to manage our infrastructure resources. An environment contains Cloud Storage buckets, Pub/Sub, Cloud functions, a Cloud SQL instance and a database.
- All the Terraform code required to create all the resources needed for an environment should be centralised in a single Git repository for ease of use. That's why we chose to put our Terraform code in the same repository as the Kubernetes descriptors in particular to simplify the Git cloning tasks of our Argo workflows. Otherwise, you'll have to manage version synchronisation between multiple repositories, which can be a real pain and also deviates from the GitOps methodology.
- Leverage infrastructure as code to setup anything that is not located inside your Kubernetes cluster.
- Manage your environment-specific secrets as code. We use Hashicorp Vault to store our secrets. For example, when we create a SQL user using Terraform, we automatically store the secret login information in Vault and ensure that a dedicated Kubernetes Service Account will have the appropriate rights to access it.
- In addition, when you’re on GKE, you can also leverage Terraform to setup the Workload identity links between your Kubernetes service accounts and your Google service account.
Secret management
As mentioned earlier, we leverage Hashicorp Vault in its open source version. It helps to store all secrets in a Key/Value store and also provides authentication methods for your machine-to-machine applications and can provide short-lived role sets (e.g. Vault role for running Terraform code in a workflow with limited lifetime and permissions).
- Environment-specific secrets must be created as code.
- Any shared password for external tool access on development environments, must be managed through a shared path.
Database
We used to have a shared database instance hosting multiple development environments. This caused us to suffix databases per environment and generated some issues when restoring data. We chose to split the shared instance into smaller, dedicated instances per environment to facilitate the management without impacting long-running environment such as our integration and our QA environment.
- The database configuration was performed using a mix of Terraform code and SQL scripts. We refactored our Terraform code using the latest version of the PostgreSQL Terraform provider to configure the Cloud SQL instance and database using a dedicated Terraform module. Furthermore, we included in this new module, the management of the created SQL users credentials into Vault which is useful for creation and deletion purpose. Then, it helped us to have a better consistency across all environments. Because each time we synchronise an environment, we run our infrastructure Terraform code that contains the database configuration to prevent configuration drift.
Creation & Deletion workflow
When thinking about ephemeral environments, a creation and a deletion workflows need to be designed before deploying the functionality to avoid any billing explosion.
For these two workflows, we leverage Argo Workflow. We use the Argo Cluster Workflow templates as a task library. This made it easier for us to reuse existing tasks and then add the missing tasks to the libraries.
Sandbox environment creation
First of all, you need to identify all the steps that need to be performed before letting your GitOps software agent manage the environment (ArgoCD in our case). Next, you need to define what a functional development environment is. We have noticed that it’s easy to provide an empty environment but it isn't really usable for a development test, especially when it comes to performing data migration. We therefore identified new tasks to retrieve a dataset from the data of our integration environment.
Below is an overview of the different steps of a sandbox environment creation, let’s go through them together.
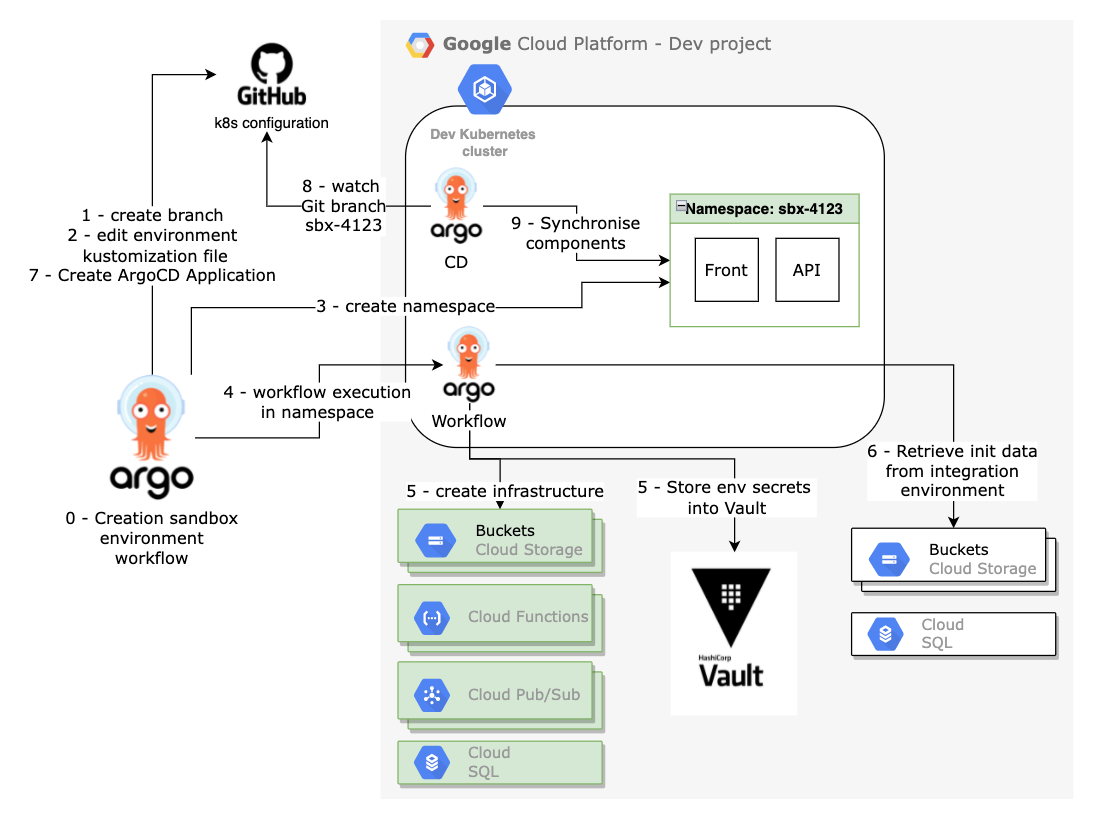
0 - Start of the create sandbox environment workflow - prerequisite check
This is the main workflow for creating a sandbox. This workflow will be run inside the Argo Workflow Kubernetes Namespace. So for security reasons, we choose to limit its rights by allowing only certain capabilities.
As a first step, you should check all the parameters passed to your workflow. Fail fast for the win, the goal here is to avoid wasting time and to exit in error as soon as possible rather than at the middle or the end of the workflow.
1 - Create Git branch
When creating a new environment, we need to create the GitOps prerequisites. Since we are using a branch per environment Git strategy, first is to create the branch hosting the Kubernetes and infrastructure sandbox environment components. The branch is created from the main branch, in order to be up to date with the latest infrastructure changes. This branch will be monitored by our GitOps software agent afterwards.
2 - Edit environment-specific parameters
As mentioned previously, we use Kustomize as a template solution for our Kubernetes descriptors. This allow us to have a single kustomization.yaml file to customise for each sandbox environment. The base descriptors will be the same for each development environment and come from the main branch. Note, at this step the Docker image versions will be initialized with the current version of the integration environment.
3 - Create a new Kubernetes Namespace with a dedicated Argo Workflow service account and its role binding
We use the main workflow rights to create a new an empty Kubernetes namespace that will host all our application components. In addition, we are creating a Kubernetes Service account and its role binding. This service account is configured to use the workload identity for Google Services access purpose. The SA and its role binding setup the foundations for running an Argo Workflow to manage an environment.
4 - Execution of a child workflow inside of the previously created namespace
Using a child workflow allows us to properly segment the access rights required for each workflow executor.
- name: wait-for-workflow-completion
  inputs:
    parameters:
      - name: wf-name
      - name: namespace
  resource:
    action: get
    successCondition: status.phase == Succeeded
    failureCondition: status.phase in (Failed, Error)
    manifest: |
      apiVersion: argoproj.io/v1alpha1
      kind: Workflow
      metadata:
        name: {{inputs.parameters.wf-name}}
        namespace: {{inputs.parameters.namespace}}
5 - Create Infrastructure & store environment secrets
In this step, we use Terraform to create all the infrastructure components (e.g. Cloud Storage Buckets, Cloud Functions, Pub/Sub, Google Service Accounts, Cloud SQL, etc..).
We could perform this step using our usual pre-synchronization Argo workflow which is executed at each ArgoCD sync during the ArgoCD pre-sync phase, but we wanted to generate all the infrastructure in advance so that we could pre-populate the buckets and database with an Integration environment dataset before the environment is available.
This step is also responsible for configuring the Vault authentication for the components and stores into a Key/Value path dedicated to the environment secrets. For common secrets such as credentials for external tools shared between development environments, they are available to all sandboxes environments on a dedicated path on the Key/Value store.
6 - Initialise data with a reference environment
To facilitate testing and avoid regression during development, we choose to pre-propagate some data. We copy some document from an integration environment bucket to the newly created bucket for the sandbox environment.
In addition, every night we perform a backup of the integration database. This allows us, in this step, to use the latest available backup and restore it to the new database.
This step concludes the child workflow.
7 - Create the ArgoCD application
When the child workflow completes successfully, the main workflow stops waiting and creates an ArgoCD application Yaml file for the new environment within a path monitored by another ArgoCD application using ArgoCD Apps of Apps pattern for automatic synchronisation.
The creation workflow is now complete, it’s now up to ArgoCD to keep the new environment in sync with each new dev commit.
Sandbox environment deletion
Before rolling out the on-demand environment creation, we advise you to think and develop the automatic deletion as well in order to not blow up your invoicing.
Our deletion workflow is simple and consists of 3 main steps.
1 - Delete the ArgoCD application
As the name suggests, this involves deleting the ArgoCD application file in the repository monitored by the ArgoCD Apps of Apps of the dev environments. The ArgoCD application definition contains a finalizer metadata that will cleanup the Kubernetes namespace and its components.
metadata:
  finalizers:
    - resources-finalizer.argocd.argoproj.io
2 - Delete the infrastructure using Terraform destroy
During this step, you can reuse your Terraform code with the destroy command to cleanup all the remaining infrastructure.
3 - Cleanup the environment Git branch
Once there is no more environment related resources on Google Cloud Platform, we can delete the environment branch from our Kubernetes configuration Git repository.
Workflow Tips
- Segment your workflow in multiple workflows if you want to manage your workflow execution more precisely.
- Fail fast, workflows may take some time to complete. The faster you get out of the way in case of error the better it will be.
- Implement a workflow/task failure strategy. This will allow you to automatically retry a task after a period of backoff or not and avoid having to relaunch it manually and/or from the start.
- Avoid retrieving your code repositories every time you need them and instead use a Persistent Volume Claim in your workflow.
- Test your workflow tasks individually if possible or at least in small batches to avoid back and forth.
- Parallelise tasks as soon as possible.
Argo Events
When both your workflows are ready, you just need a trigger mechanism.
That’s where Argo Events comes in.
Argo Events is an event-driven workflow automation framework for Kubernetes which helps you trigger K8s objects, Argo Workflows, Server-less workloads, etc. on events from a variety of sources like web-hooks, S3, schedules, messaging queues, GCP PubSub, SNS, SQS, etc.
As we were already using ArgoCD and Argo Workflow, it became a natural choice for us. It’s easy to use and quite well documented like the rest of the Argo projects.
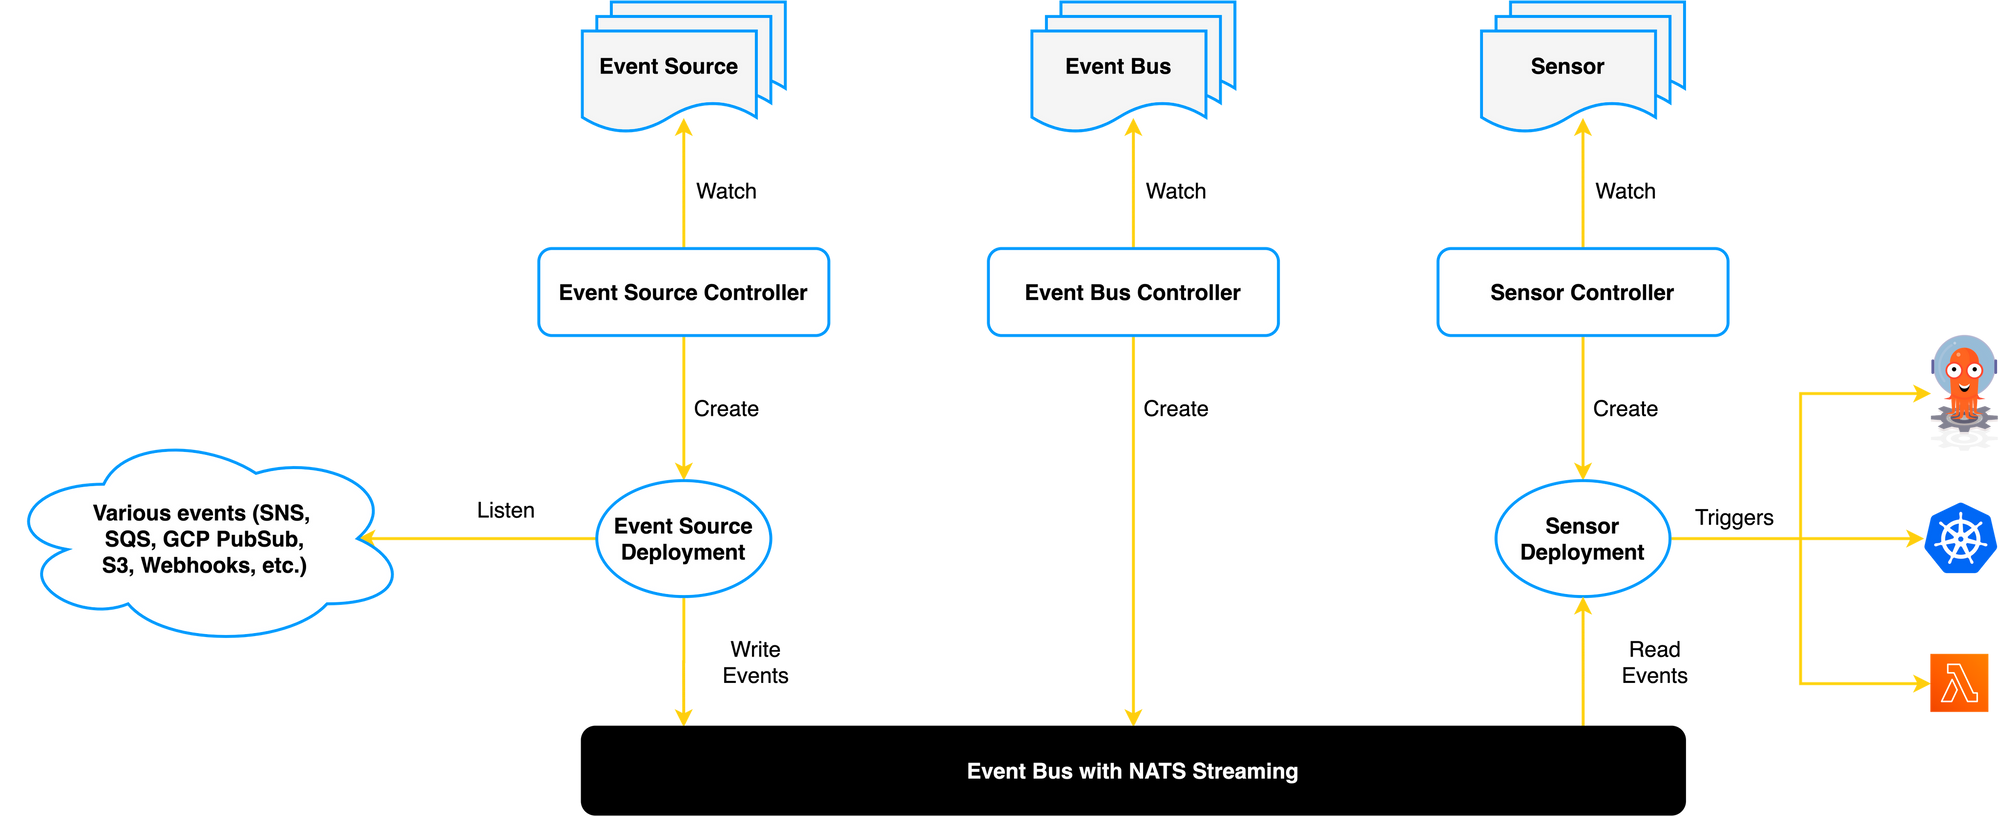
Event Source
We have created an Event Source which is the configuration for receiving events. In our case, Argo Event Source is a web hook that receives Pull Request events from GitHub on the application’s source code repository. The Event Source will receive the full payload from Github and redirect it to your sensors.
Sensors
A sensor contains the list of dependencies and theirs associated triggers. It listens for events related to an Event Source.
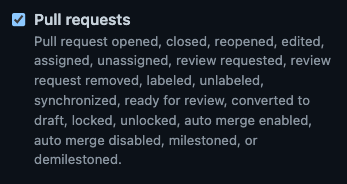
We have designed two Sensors. Each sensors will receive all the Pull Request events as configured in the web hook section of Github (see picture below).
Dependencies
First, let’s review and explain the dependencies section for the sandbox creation sensor.
dependencies:
  - name: sandbox-creation
    eventSourceName: github-platform-source-code-repo
    eventName: platform-source-code-webhook-pr
    filters:
      data:
        # Actions to consider
        - path: body.action
          type: string
          value:
            - opened
            - reopened
            - labeled
        # We expect the open status
        - path: body.pull_request.state
          type: string
          value:
            - open
        # We are searching for a "create-sandbox" label inside the labels list
        - path: '[body.pull_request.labels.#(name=="create-sandbox").name]'
          type: string
          value:
            - create-sandbox
To begin with, we wanted to control the sandbox environment creation. So, in addition to the opened/reopened action, we added the requirement to specify a label on the pull request to create an environment. This also allowed us to duplicate the sensor on another cluster but with a different value for the label name. In the same way, you can specify your target cluster for dispatching dev environments or for debugging purpose like we did.
Filtering
If you want to reference a payload key inside a filter you must start by referencing the body of the payload. body.action will reference the web hook action of the event e.g. opened
Data filter supports GJSON path syntax SYNTAX.md
This syntax allow JSON transformation on the fly. It becomes handy when in need for “multiple paths” filtering such as:
#pseudo code
WHEN (action=A OR (action=B AND condition=C))
TRIGGER workflow
It is tricky but using GJSON, we can generate an array [action, condition]. Values are optional, and the array can be filled in many ways, let’s consider a few exemples :
- Case 1 :
["A"] - Case 2 :
["A","Z"] - Case 3 :
["B","C"] - Case 4 :
["B","D"] - Case 5 :
[""]
To match our need, we can use a the REGEX (A.*)|(B.*C) so the workflow will be triggered in case 1;2 and 3.
Note, you can test GJSON syntax on GJSON Playground
Triggers
For the sandbox environment creation and deletion, we use our sensors to trigger some Argo Workflows. A workflow can be instantiated directly by specifying the Kubernetes descriptors definition like below.
triggers:
# Create sandbox environment
- template:
name: bootstrap-sandbox # Our sandbox environment creation workflow name
retryStrategy:
steps: 3
k8s:
operation: create
source:
resource:
apiVersion: argoproj.io/v1alpha1
kind: Workflow
metadata:
generateName: webhook-create-env-sandbox-pr-
namespace: argo-event # namespace to use for the workflow execution
spec:
serviceAccountName: workflow-executor # Argo Workflow SA
arguments:
parameters:
- name: environment
value: sbx-pr-
- name: namespace
value: apps-sbx-pr-
workflowTemplateRef:
name: bootstrap-sandbox
clusterScope: true
parameters:
# Inject PR number inside generated name
- src:
dependencyName: sandbox-creation
dataTemplate: '{{ .Input.body.pull_request.number }}-'
dest: metadata.generateName
operation: append
# Inject PR number to `environment` parameter
- src:
dependencyName: sandbox-creation
dataKey: body.pull_request.number
dest: spec.arguments.parameters.0.value
operation: append
# Inject PR number to `namespace` parameter
- src:
dependencyName: sandbox-creation
dataKey: body.pull_request.number
dest: spec.arguments.parameters.1.value
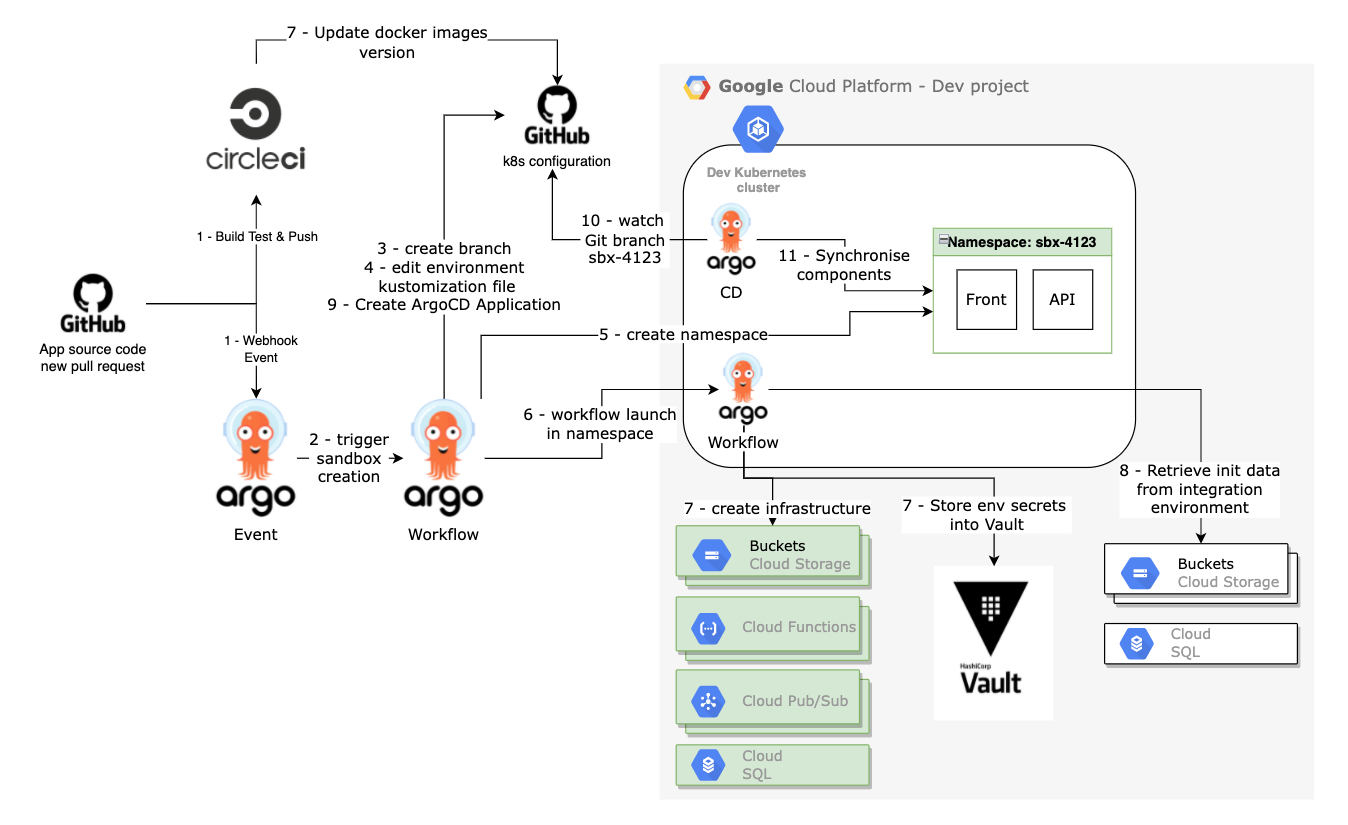
operation: appendAs you can see at the bottom of the code snippet, you can also customise your workflow parameters using values from your event payload. In this example, we use the Pull Request number to suffix the environment and so have a unique environment name.
Sandbox Creation process overview
Argo Events was the missing piece to automate the process coming from a development commit to a change on a dedicated environment. Below you can see the full picture of our workflow with the Circle CI (Continuous Integration tool used for our application) running in parallel to the creation sandbox workflow. As soon as the CI process is complete, it updates the k8s configuration Git repository on the sandbox environment branch. Then, when the environment is ready to be used, ArgoCD will deploy and maintain the Docker image versions push by the CI until we merged/closed the PR and that we will delete all the sandbox environment infrastructure.
What’s next?
We are still in the testing phase of creating and removing sandboxes environment with the label requirement to control it carefully and still not to apply it on every pull requests.
With all the data collected during this experimentation phase, we will have more information to implement Kubernetes cluster horizontal auto-scaling and the sandbox environment shutdown during team’s night time to optimise our costs.
In addition, we continue to challenge the definition of our tasks in order to reduce the duration of the complete process to have an environment fully available (~45min currently).
Another important step will be to provide feedbacks directly on the pull request. To begin with, we will give feedback about the availability of the sandbox environment. Then, we will provide the results of non-regression testing as a Github status check. The non-regression testing suite will be executed using an Argo Workflow.
Thank you!
If you want to be part of this adventure, we are currently hiring more TechOps Engineers and we also have several other positions open! ✨
At QIMA, we relentlessly help our clients succeed. If you have any suggestion or remark, please share them with us. We are always keen to discuss and learn!
Written by Guillaume Camus, TechOps Engineer at QIMA. ✍️